AWS Credentials from AWS Config or Crendential file
You may use this account type if you would like to load Amazon S3 credentials and session tokens from
AWS Config or Crendential file.
AWS Credentials File
AWS Credentials file is usually stored in %USERPROFILE%\.aws\credentials and has the following format:
[default]
 aws_access_key_id=ACCESS_KEY
 aws_secret_access_key=SECRET_KEY
 aws_session_token=TOKEN
The file may contain multiple profiles:
[default]
 aws_access_key_id = ACCESS_KEY
 aws_secret_access_key = SECRET_KEY
 aws_session_token = TOKEN

[Alice]
 aws_access_key_id = Alice_access_key_ID
 aws_secret_access_key = Alice_secret_access_key

[Bob]
 aws_access_key_id = Bob_access_key_ID
 aws_secret_access_key = Bob_secret_access_key
You may specify the profile name when configuring account properties.
AWS Config File
AWS Config file is usually stored in %USERPROFILE%\.aws\config and has the following format:
[default]
 aws_access_key_id = ACCESS_KEY
 aws_secret_access_key = SECRET_KEY
 aws_session_token = TOKEN

[profile Alice]
 aws_access_key_id = Alice_access_key_ID
 aws_secret_access_key = Alice_secret_access_key

[profile Bob]
 aws_access_key_id = Bob_access_key_ID
 aws_secret_access_key = Bob_secret_access_key
As you may note it has the same format as the credentials file except the profile sections.
Profile sections must have the format of [profile profile-name], except for the default profile.
The following variables are supported in both AWS Credentials File and AWS Config File:
-
aws_access_key_id - AWS access key.
-
aws_secret_access_key - AWS secret key.
-
aws_session_token - AWS session token. A session token is only required if you are using temporary security credentials.
You may also use the following variable to specify custom s3 endpoint:
-
s3_endpoint - custom s3 endpoint, for example my.custom.domain.com
To load Access Keys from AWS Config or Crendential file
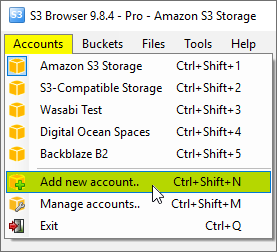
1. Start S3 Browser and click Accounts -> Add New Account.

Click Accounts -> Add New Account
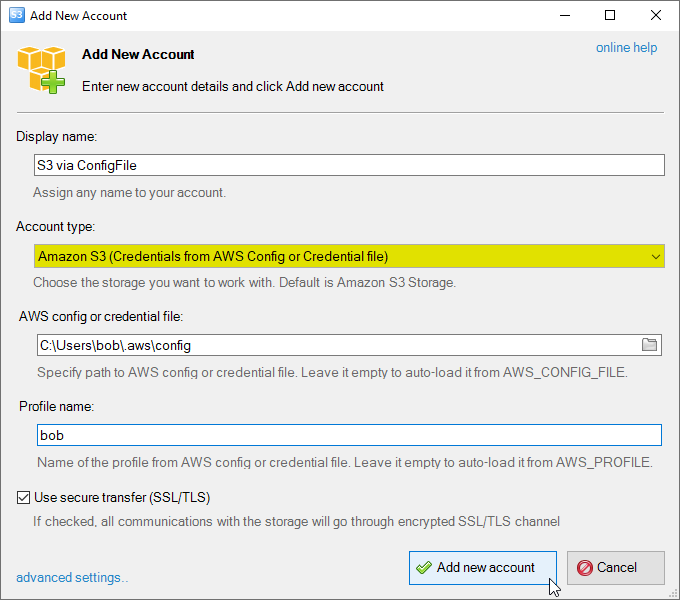
The Add New Account dialog will open:

Add New Account dialog.
2. Select Amazon S3 (Credentials from AWS Config or Crendential file) as account type.
3. Specify AWS Config or Crendential file. If you leave this field empty,
S3 Browser will attempt to load it from the %AWS_CONFIG_FILE% environment variable.
4. Specify Profile name. If you leave this field empty, S3 Browser will attempt
to load it from the %AWS_PROFILE% environment variable and use the default profile
if it is empty.
5. Enable SSL/TLS option if you would like to work via encrypted SSL/TLS channel.
6. Click Add new account
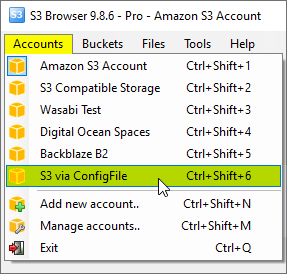
You can now choose the newly added account from the accounts menu:

Click Accounts -> Account Name to switch between accounts.
Advanced Account Settings
You may also configure additional settings when adding new or editing existing account.
In order to open advanced account settings, please click the advanced settings link
located at the bottom left corner of the dialog.
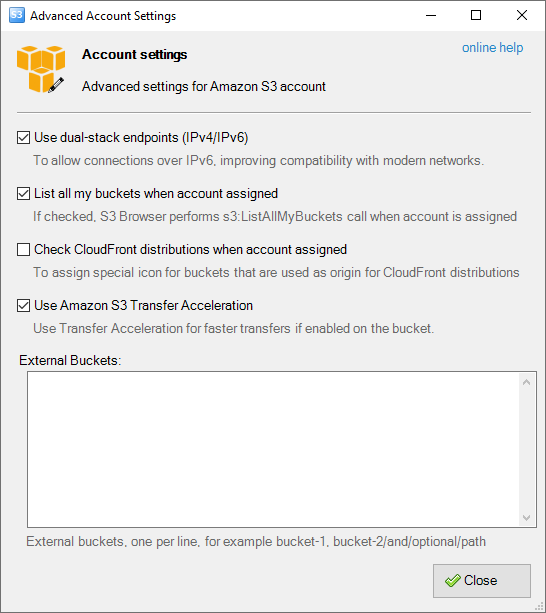
The Advanced Account Settings dialog will open:

Advanced account settings
You may configure the following settings here:
Enable Dual-Stack Endpoints (IPv4/IPv6) - When checked, S3 Browser will use dual-stack endpoints
to access storage, allowing connections over both IPv4 and IPv6.
This improves compatibility with networks that support IPv6.
List All My Buckets When Account Assigned - When checked, S3 Browser will perform the
s3:ListAllMyBuckets call when the account is assigned. If the account does not have permission
to list all buckets, you can uncheck this option to avoid failed tasks and warnings in the log.
Check CloudFront Distributions When Account Assigned - When checked, S3 Browser will perform the
cloudfront:ListDistributions call when the account is assigned, allowing it to set a special
icon for buckets used as origins for CloudFront distributions. If the account does not have permission to
list CloudFront distributions, you can uncheck this option to avoid failed tasks and warnings in the log.
External Buckets - You can edit the external buckets associated with the account. Each bucket should be listed on a new line.
Optional paths are also supported, with a slash used as the delimiter (e.g., my-bucket/and/optional/path).
|

