Sharing Amazon S3 Buckets and Files (ACLs)
How to make your files publicly available
With S3 Browser Freeware
you can easily make your files publicly available, i.e. make them available for everyone.
This is required if you plan to use these files on your website,
or if you want to send one or multiple files to someone.
To make your files public:
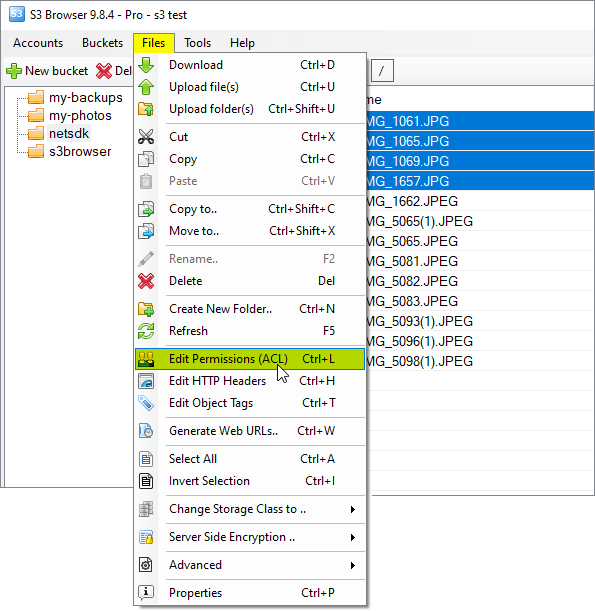
1. Select the files you want to share and click Files, Edit permissions:

Select the files you want to share and click Files, Edit permissions
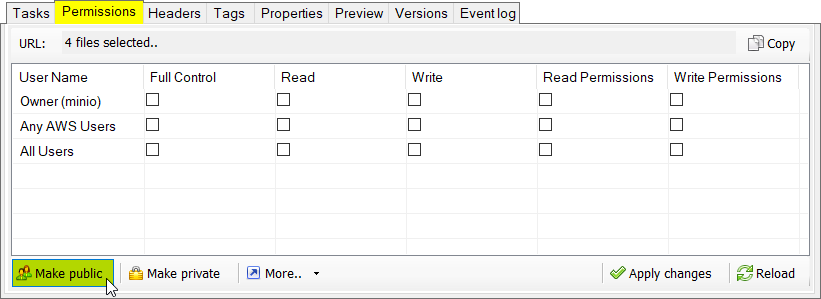
The Permisions tab will open:

Select files, open Permissions tab and click Make Public
2. Click Make Public.
If all operations completed successfully, you will see the following message:

Permissions successfully updated
4. Click the Copy button to copy web urls to clipboard.

How to copy web urls to clipboard
In our example the following web urls were generated:
https://s3browser.s3.amazonaws.com/DSC06258.JPG
https://s3browser.s3.amazonaws.com/DSC06259.JPG
https://s3browser.s3.amazonaws.com/DSC06267.JPG
https://s3browser.s3.amazonaws.com/DSC06272.JPG
Now these files are accessible to everyone. You can use generated web urls on your website or blog,
or send them to someone.
How to share Amazon S3 bucket with another AWS user
Please check out this manual if you would like to share your bucket with existing AWS user
Please check out this manual if you would like to create sub-accounts under your main AWS account
and grant them permissions to your bucket
How to edit bucket/file permissions
Please check these articles
to learn the basics of Permissions editing. Here we will explain some additional
features of the Permissions editor.
Permisions Table - Rows
Each row represents Grantee. There are four types of Grantees:
- Owner
- Authenticated Users
- All Users
- User by Email/Id
Owner - Every bucket/file in Amazon S3 has an owner, the user that created
the bucket/file. The owner of a bucket/file cannot be changed.
Authenticated Users - Anyone with an Amazon AWS account. Although this is inherently
insecure as any AWS user who is aware of the bucket/file will be able to access it,
you might find this authentication method useful.
All Users - Anonymous access to any Amazon S3 bucket or file. Any user will be
able to access the files.
User by Email/ID - User with Amazon Web Services account. You use Email or ID to specify the user.
Any users that you grant access will be able to access buckets and files using their AWS Access Key
IDs and Secret Access Keys.
Permissions Table - Columns
Each column represents a permission. The permission in a grant describes the type of access to be
granted to the respective grantee. There are five types of permissions:
- Full Control
- Read
- Write
- Read Permissions (READ ACP)
- Write Permissions (WRITE ACP)
Full Control - Provides Read, Write, Read ACP and Write ACP permissions. It does not provide
any additional rights and is included only for convenience.
Read - When applied to the bucket, grants permissions to list the bucket. When applies
to the file, this grants permissions to read the file data and/or metadata.
Write - When applied to the bucket, grants permission to create, overwrite, and delete
any file in the bucket. This permission is not supported for files.
Read Permissions (READ ACP) - Allows a user to read permissions for the specified bucket or file.
Write Permissions (WRITE ACP) - Allows a user to overwrite permissions for the specified bucket or file. The owner of a
bucket or file always has this permission implicitly. Granting this permission is equivalent to
granting Full Control because the grant recipient can make any changes to the permissions.
Make Public button allows you to grant Read permission to All Users
making the file available for everyone.
Make Private button allows you to reset permissions and make selected file(s) private.
More -> Add user by Email/ID button allows you to add user by Email/ID
More -> Remove user will delete selected user from the grantees list.
Apply for all subfolders and files - enable this checkbox if you want to apply permissions to
all subdirectories and files.
Apply - apply changes.
Reload - reload permissions (all unsaved changed will be lost)
|

